
My people, it is time to elevate our "gif" game. The days of dailup are over.
This tutorial is aimed at Linux/OSX users. But Windows users can follow the same steps. I'll show you how to create high quality gifs like the one above using Gimp and a few other programs.
You'll need:
python 2.x
youtube-dl | http://rg3.github.io/youtube-dl/
ffmpeg or Openshot | http://www.ffmpeg.org/ | http://www.openshot.org/
Gimp | http://www.gimp.org/
gifsicle | http://www.lcdf.org/gifsicle/
1) Get the video from youtube. This step can be skipped if you already have a video source.
I'll be using "MotoGP™ Motegi 2013 -- Best slow motion"
Video location: https://www.youtube.com/watch?v=UEqzjKrWhAk
Download the video
From terminal execute: youtube-dl -citF https://www.youtube.com/watch?v=UEqzjKrWhAk

22 (best) is the highest quality. Thats our target
From terminal execute: youtube-dl -citf 22 https://www.youtube.com/watch?v=UEqzjKrWhAk

Great, now you've just downloaded your target youtube video in high quality (22). Read the manual on youtube-dl to figure out the command options I used.
2) Convert the target video into PNG
I opened the file "MotoGP™ Motegi 2013 -- Best slow motion-UEqzjKrWhAk.mp4" in the best video viewer VLC (http://www.videolan.org/) to review the video. I know the frames of video I want for the gif are from about 22 seconds to 34 seconds which is a total of 12 seconds. So I will extract that time range using ffmpeg as png files.
From terminal execute the following:
#Make an output directory
ballen:giftut ff$ mkdir pngout
#Use ffmpeg to convert (start time) -ss of 22 seconds for 12 seconds (-t) and output the png files into the above directory.
ffmpeg -i MotoGP™\ Motegi\ 2013\ --\ Best\ slow\ motion-UEqzjKrWhAk.mp4 -ss 22 -t 12 pngout/%05d.png

Change directory into pngout and see the png files we've extracted. We will use these in gimp.

Openshot
If you do not have ffmpeg the same steps can be done in Openshot. For Openshot, Import the video and cut it down to the section of the video you want to gif. Export the section of video you would like using the "Convert into Image Sequence" under advanced options. This will save the video as PNG just like we did above into a target directory you select.
Note, if the video portion you want to "gif" is 5 seconds, extend the video to "6" seconds on the video track. Openshot seems to like to leave out the last bit of the video when converting to PNG for some reason.
3) Creating the animated gif in Gimp.
Open Gimp
next
Open Gimp
next
File > Open
Open the first file 00001.png in Gimp

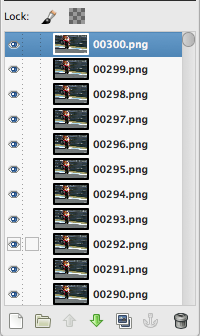
Next open the rest of the png files as layers in gimp by doing.
File > Open as Layers and select 00002.png to 00300.png and hit Open
(by selecting 00002.png and hold down the shift key, you can scroll down to 00300.png which is the last frame in the animation)
Importing might take some time but the end result is this.
If the view looks odd from Windows menu bar select Single - Window Mode
Next select
Image > Scale Image
Set Width: 360 Height 203
Note: this varies on the size of your gif, in this case the gif is already large, so I made the final animation relatively small
Under Quality select
Interpolation > Sinc (Lanczos3)
Select Scale

(Note, this size is pretty small compared to the normal size I use, however this gif is based off film in slow motion and uses a lot of frames. Next tutorial i'll show a trick you can use to reduce large gif file sizes with gifsicle)
Next select
Image > Mode > Indexed
Use the following options and press Convert

After you've instructed your gif to use an optimum color palette, we need to export the gif with
File > Export As > and give your gif a name and press Export

Use the settings in the Export Image as Gif window below. Notice the time indicates 40 milliseconds. Normally this default value of 100 (per frame) can be too slow for most animations. Setting it to 40 will put this animation on point as far as play speed is concerned. Also notice Loop forever is set. I unset Interlace and Gif Comment to unselected. Frame disposal where unspecified I set to I don't care. Press Export

After the Export is complete check the size of your gif. 13 Megs isn't to bad :D

4) Optimize the final gif with gifsicle
Gifsicle can technically do all of this minus the video conversion. I will cover gifsicle in the next tutorial. For now, we will use it to do a simple Optimization which will reduce the file size some.
All we will do is run a simple optimization
From terminal execute: gifsicle -O3 jsmarcmotogp.gif > jsmarcmotogp2.gif

We save some space on the final gif. This optimization trick can produce good results sometimes.
5) Complete
Uploaded the final version of the gif to http://gfycat.com/ which is using html5 and will compress the gif even future or to G+.
Enjoy,
And ride safe my people
Enjoy,
And ride safe my people

Thank you so much. Your tutorial was written in a way that I got right away, now my gif's look really good.
ReplyDeleteyou're welcome!
DeleteOMG! duuude the gifs i made with this method are perfect. Thank u so much
ReplyDeletei find a free online image converter to convert gif image file.
ReplyDeleteThis is excellent! Easy to follow and the result is wonderful, thank you!
ReplyDeletethank you for sharing.
ReplyDeleteMelbourne SEO Services
Really appreciate your work. This online converter may become useful
ReplyDeletehttps://onlineconvertfree.com/convert/gif/
Perfect! Worked in one go.
ReplyDeletePlease bathe in the pleasure of having helped out yet another person.